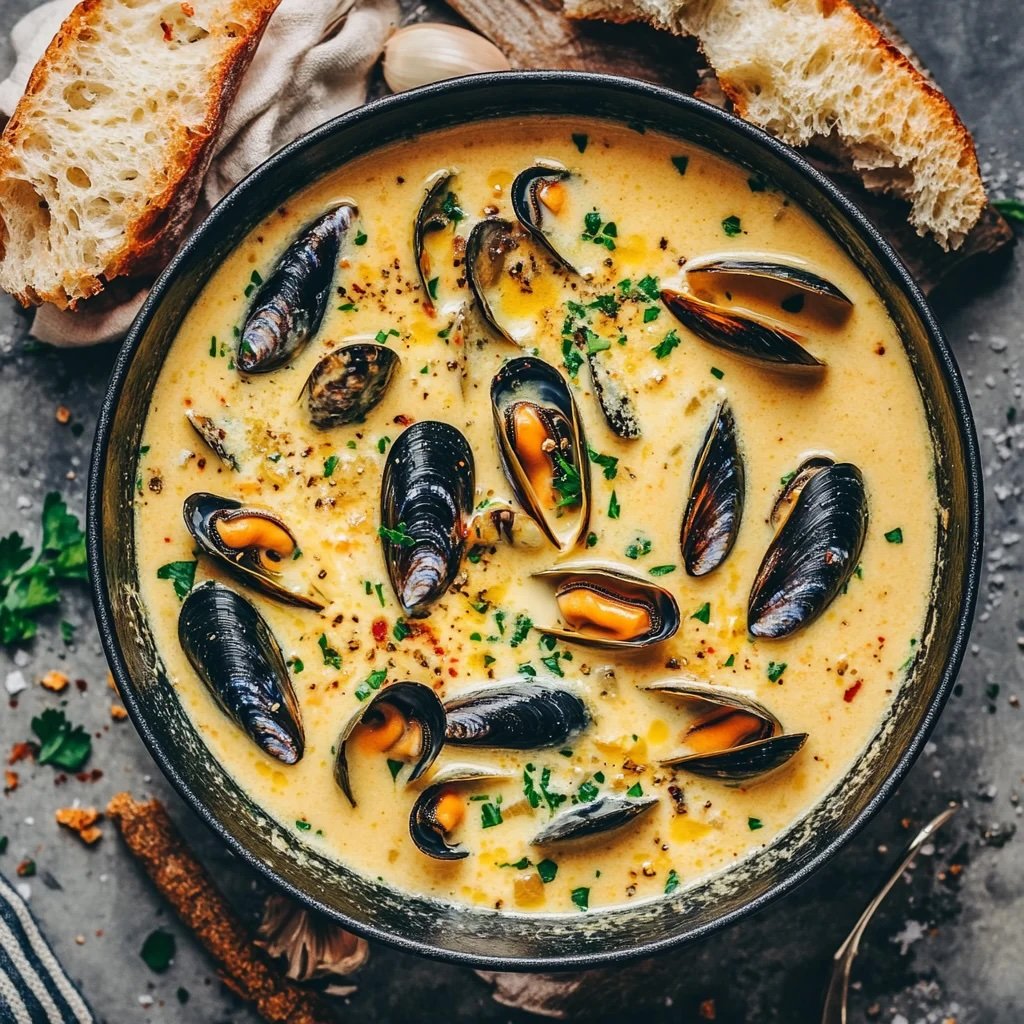
GAIL MONAGHAN

COOKING - ENTERTAINING - LINENS

April 2024 - Green Pea Hummus

Gail Monaghan

GREAN PEA HUMMUS

About the Recipe

Spring is the time to celebrate green peas. I've been meaning to share this GREEN PEA HUMMUS recipe ever since I concocted it last summer after tasting the LOAVES and FISHES version at a dinner party in Bridgehampton. So now that it's April and I still haven't done it, here goes. I have no idea how close my version is to the original as I had no recipe to follow but I'm very happy with it.

People seem to love it and I've had many requests for the recipe. Make extra as it freezes well (see note below).


Green Pea Hummus

Ingredients

  • 400-gram can of chickpeas, drained and rinsed in cool water. Drain again well

  • 1 16-ounce bag frozen peas, thawed

  • 6 large garlic cloves (more or less to taste)

  • 5 tablespoon tahini

  • Juice of 2 lemons plus optional zest

  • 4-6 tablespoons extra virgin olive oil

  • 3 tablespoons fresh coriander or parsley leaves—optional

  • 1 teaspoon salt or more to taste

  • ½ teaspoon freshly ground black pepper or more to tasteMethod

Method

  1. Put all the ingredients in a food processor and blitz until smooth.

    Taste and adjust any quantities if necessary. You can add extra lemon juice, olive oil, salt, tahini, garlic or fresh herbs.

NOTE: this hummus freezes well. Thaw to use but the hummus may be a bit grainy. Best to re-blitz with a bit of olive oil. And re-adjust seasonings.

March 2024 - Peanut Sauce Glazed Chicken Pan Roast

Gail Monaghan

PEANUT SAUCE GLAZED CHICKEN PAN ROAST

with Ginger, Garlic and Sesame

About the Recipe

This recipe for glazed chicken thighs with peanut sauce is a mishmash combination of several recipes I've experimented with over the years. This is (at least currently) my favorite version. It is completely delicious.

You can make the peanut sauce weeks ahead and keep refrigerated. I usually double or triple the recipe as I make these chicken thighs a lot. Once the sauce is made, the recipe takes 15 minutes or less of active work time. 

I serve this dish with rice or sesame noodles or even simple wholewheat couscous (not the traditional accompaniment and mixing cuisines but delicious and easy).

If you have some time, make Vietnamese Summer Rolls (last month's RECIPE OF THE MONTH) for a first course.

A good and easy dessert is an assortment of tropical flavored ice creams (Haagan Daz makes delicious MANGO and COCONUT-PINEAPPLE ice creams) and sorbets and a platter of tropical fruits--I usually slice up mango, pineapple and banana.

Enjoy.


Peanut Sauce Glazed Chicken Pan Roast with Ginger, Garlic and Sesame

Yields 8-10 servings

Ingredients

  • 2 tablespoons toasted sesame oil

  • 4 teaspoons kosher salt plus more as needed

  • 4 teaspoon finely grated fresh ginger 

  • 8 garlic cloves, finely grated or minced

  • 5-6 pounds bone-in, skin-on chicken thighs 

  • 1 recipe Vietnamese Peanut Dipping Sauce (see below)

  • 2 tablespoons neutral oil

  • 4 scallions, thinly sliced and ¼ cup cilantro chopped for garnish

Method

  1. Mix together sesame oil, salt, ginger and garlic. Add 4 tablespoons of the peanut dipping sauce and smear mixture all over the chicken and underneath the skin. Use it all.  Place in a lidded container or large ziplock bag and  refrigerate at least an hour and up to 48 hours. 2-3 hours before baking, remove chicken from refrigerator and place on a rimmed baking sheet. You can line the baking sheet with parchment to make clean-up easier, but it’s not necessary.

  2. Preheat oven to 425 degrees. Drizzle chicken with the neutral oil. Roast until the chicken is golden brown and the juices run clear when the thickest part of the thigh is pricked with a fork, 30 to 40 minutes or less and about 158 on a thermometer. Can broil briefly to crisp up if needed.

  3. Transfer chicken to a serving platter and carefully pour any pan juices on the baking sheet into the bowl with the peanut sauce. Whisk until combined. Taste the sauce and add more soy sauce, vinegar or hoisin if you’d like.

  4. Drizzle or brush some of the peanut sauce all over chicken pieces, reserving some sauce for serving. Garnish with scallions and cilantro and serve with reserved peanut sauce.

Vietnamese Peanut Dipping Sauce

 Ingredients

  • 4 tbsp neutral cooking oil

  • 8 cloves garlic minced

  • 10 tbsp hoisin sauce

  • 4 tbsp smooth peanut butter or tahini or a mixture

  • 1 cup water

  • 2 tsp sambal chile paste or or Chinese chili paste

February 2024 - Shrimp Summer Rolls

Gail Monaghan
vietnamese-spring-rolls.png

SHRIMP SUMMER ROLLS

with Sweet and Spicy Chili Dipping Sauce

About the Recipe

I've been serving these shrimp summer rolls for 30 years and this recipe for them is still the best I've found. Perfect for Make-ahead. Make the filling a day or two in advance and the spicy dipping sauce weeks ahead. Assemble the rolls earlier in the day, or if your party is on the casual side, have everyone join in and make their own as we do in class. It's an ice-breaking activity (if that sort of thing is still a thing) and lots of fun!

Although they are called  SUMMER ROLLS, I love them all year long. They're a perfect light lunch or serve them — as I often do — as a first course before a more elaborate Asian meal. People ADORE them. Toss any leftover filling together with leftover dipping sauce for a great salad. 


Summer Rolls

Makes 16 rolls, serving 8 as an appetizer 

Time: Approximately 30 minutes.

Ingredients

  • 1 tablespoon neutral vegetable oil such as canola

  • 8 cloves garlic, peeled and minced

  • 4 ounces Asian vermicelli noodles

  • 3/4 pound cooked, shelled and roughly chopped shrimp (roughly chopped cooked chicken or roast pork may be substituted)

  • 1/2 head Napa cabbage or 1 whole head soft lettuce such as Boston, finely shredded

  • 4 medium carrots, peeled and shredded or coarsely grated

  • 1 large bunch cilantro, chopped (save stems for the dipping sauce)

  • 1/2 cup fresh mint leaves, roughly chopped

  • 8 whole scallions, cut in paper thin rounds

  • 1 ½ tablespoons ground coriander

  • salt and freshly ground pepper to taste

  • 16 sheets 22 centimeters round or square rice paper (banh tang)

  • 1 recipe Sweet and Spicy Dipping Sauce (below)

Method

  1. In a medium skillet, heat the oil and fry the garlic until golden, about 5 minutes. Off heat stir in the shrimp and set aside.

  2. Soak the vermicelli in warm water for 15 minutes. Drain noodles and cook in boiling water, stirring frequently to break up the clumps, until al dente, 2-3 minutes.

  3. Drain cooked noodles and refresh under cold water. Drain again and set aside.

  4. In a large bowl, toss together the cabbage or lettuce, carrots, cilantro, mint, scallions, ground coriander, garlicky shrimp and cooked vermicelli. Add salt and pepper to taste.

  5. Immerse one rice paper at a time in a warm-hot water, Watch for it to begin curling, then immediately flip it over and continue flipping until it is just softened, 30-60 seconds. Use both hands to pull it up out of the water, being careful it doesn't collapse on itself or tear, and spread it immediately on a damp kitchen towel. 

  6. Place 1/16 of the filling mixture (3-4 tablespoons) near the top of the wet wrapper. Roll the top end tightly over the filling and then fold in the sides. Finish rolling till closed and snug. The final product will look like a small burrito. 

  7. Continue this way until all 16 are finished. They can wait covered with a damp towel until ready to serve, up to 3 hours.

  8. To serve, cut each in half horizontally and serve 4 halves per person accompanied by Sweet Chili Dipping Sauce. 

Sweet and Spicy Chili Dipping Sauce

Makes approximately 1 ½ cups

Time: Active time: 10 minutes plus cooling time 

 Ingredients

  • Cilantro stems reserved from the filling, chopped

  • 2 cloves garlic, peeled and minced

  • 1 tablespoon neutral vegetable oil such as canola

  • 1 cup minus 3 tablespoons (13 tablespoons) unseasoned rice wine vinegar (white wine vinegar may be substituted)

  • 2 tablespoons fish sauce

  • 2 tablespoons Asian Red Pepper Paste or Garlic Chili Paste

  • 1/2 cup sugar

  • 2-3 tablespoons freshly squeezed lime juice or more to taste

Method 

  1. In a medium saucepan, saute chopped cilantro stems and garlic in the oil until very fragrant and garlic is beginning to color, about 5 minutes. 

  2. Add vinegar, fish sauce, paste, and sugar and simmer until the sugar has dissolved, 3-5 minutes. Cool to room temperature. Add lime juice. Taste and adjust seasoning—fish sauce, salt and pepper-- before serving.

January 2024 - Bananas Foster

Gail Monaghan

BANANAS FOSTER

About the Recipe

Bananas Foster is an ideal comfort food for cold-weather January. A counterpart to weeks of too much fancy holiday fare, this rustic dessert is a nursery pudding beloved by adults due to the addition of copious alcohol.

My ex-husband Willy grew up in New Orleans. Though not much of a cook, he made fabulous Bananas Foster. By over-caramelizing the bananas with lots of butter, sugar and an extravagant amount of dark rum, he turned the more refined dessert of his youth (white rum, white sugar and less darkly caramelized) into something wildly flavorful and robust. He eliminated the banana liqueur as unnecessary and a bit prissy, but I like it. If curious, add 2 tablespoons for each cup of dark rum. 

And do make extra. People always want seconds. And if they don't, extra sauce keeps in the fridge for several days. Reheated, it's good on pancakes, waffles and French toast as well as on more ice cream.


BANANAS FOSTER

Serves 8

Ingredients:

  • 1 cup unsalted butter

  • 8 bananas, peeled, sliced in half lengthwise and then each piece in half crosswise

  • 1 3/4 cups dark brown sugar

  • 1 teaspoon ground cinnamon

  • large pinch sea salt

  • 1 cup dark rum (such as Meyer’s)

  • 2 tablespoons banana liqueur (optional)

  • 2 pints best quality vanilla ice cream


Method

  1. 1. In a large skillet set over medium heat, melt the butter and then add the bananas in one layer.

  2. Sprinkle with the sugar, cinnamon and salt.  After the first side browns and begins to caramelize (about 1 minute), use a spatula to gently turn and brown the second side. Turn a few more times until the sugar melts and the sauce thickens and caramelizes.  Don’t let it burn, but short of burning the more sticky and caramelized, the better.

  3. Turn off the heat but leave the skillet on the burner. Stir in 1/4 cup of the rum being careful not to break up the bananas. 

  4. Meanwhile warm the rum in a small saucepan over medium heat.  Pour the warmed rum carefully over the bananas and ignite with a match. Shake pan and stir until all the flames die out. Be careful not to catch anything on fire.

  5. Serve in dessert bowls over or under vanilla ice cream. 

December 2023 - Baked Alaska

Gail Monaghan

BAKED ALASKA

About the Recipe

December is a month full of festive occasions, and Baked Alaska is a wildly festive dessert, Defined by freezing ice cream on the inside and toasty, chewy —gooey meringue on the exterior — it's unique. The cake and the meringue serve as insulators, protecting a frozen filling from the heat of a hot oven. In the "olden days" (the late 1950s and 60s when my mother was in the kitchen, for extra insulation, a sheet of heavy brown paper was placed on the cookie sheet under the cake layer. Now, however, home freezers are much colder and double protection is no longer necessary. In fact, sometimes I find the ice cream still hard as a rock post-oven and must wait a few minutes before it can be cut.

For me, the combination of coffee ice cream and a dark rum drizzle on the cake is perfection, but options are endless. Hard to go wrong. Lemon custard ice cream with a limoncello drizzle is not at all bad. Ditto the classic combination of vanilla ice cream with sliced very ripe peaches,plums or apricots or fresh berries between the cake and the ice cream. You can also experiment with layering more than one ice cream flavor and;/or include a layer of sorbet.

You can make the cake ahead, drizzle with liquor, top with ice cream, wrap well and freeze for up to 3.months. Preheat your oven before dinner and when time for dessert, just whip up your meringue, swirl it over the ice cream and bake 3-5 minutes until the meringue peaks are deeply golden..That's all there is to it. Voila. It's literally my favorite dessert on the planet.


BAKED ALASKA

Serves 12-18

Ingredients:

For the Cake Base:

  • All ingredients should be room temperature

  • 2 cups flour

  • 2 teaspoons baking powder

  • 1/2 teaspoon salt

  • 2 sticks unsalted butter

  • 2 cups sugar

  • 6 large eggs

  • 2 tablespoons vanilla extract

  • 3 tablespoons liqueur (if using)

For the Ice Cream Layer:

  • 5 pints best quality coffee ice cream

For the Meringue:

  • 8 egg whites at room temperature

  • 1/8 teaspoon salt

  • 1/2 teaspoon cream of tartar

  • 2 cups sugar plus 2 tablespoons for sprinkling

  • 2 teaspoons vanilla extract


Method

For the Cake Base:

  1. Preheat oven to 350F

  2. Butter, flour and line 2 10-inch cake pans

  3. Stir dry ingredients together and set aside

  4. Using an electric mixer, cream the butter and the sugar until light and fluffy

  5. Add eggs, one at a time, and then the vanilla. Beat well, then add dry ingredients and beat just until combined.

  6. Divide batter between two 10-inch cake pans and bake just until a toothpick inserted into the centers comes out clean. Cool 10 minutes and invert onto wire rack. Cool completely.

    • Use one for the recipe above. Once cool, the second layer can be wrapped in plastic wrap and then foil and stored almost indefinitely in the freezer for your next Baked Alaska.

For the Ice Cream Layer:

  1. Soften the ice cream and freeze in a metal bowl with a diameter an inch or two smaller than the cake layer. Cover the ice cream with foil and then foil and freeze until very hard, preferably at least 6 hours and up to 4 weeks.

When Ready to Serve:

  1. Preheat the oven to 450 or 500 F

  2. Place the room temperature egg whites and the salt in the bowl of an electric mixer. With the whisk in place, mix on low speed until frothy. Add the cream of tartar and mix on medium speed until soft peaks form. While mixing add the sugar in a slow steady stream and raise the speed to high. Beat until the egg whites are stiff but not dry. Add the vanilla and mix to blend.

  3. Place the frozen cake on a heatproof oval platter large enough to hold it. Drizzle with the liqueur, if using, and sprinkle with the granulated sugar.

  4. Unmold the ice cream and place on top of the cake making sure the cake border is even all around the ice cream. Using a spatula, decoratively swirl ALL the meringue over the cake and ice cream, running the meringue down to the platter. Make sure the cake and ice cream are completely sealed in by the meringue.

  5. Sprinkle the last two tablespoons of sugar over the meringue and IMMEDIATELY place in the upper third of the oven. Cook until lightly browned, about 3-5 minutes. Watch carefully. Serve immediately before the ice cream melts.

November 2023 - Moroccan Chicken Tagine with Simple Couscous

Gail Monaghan

MOROCCAN CHICKEN TAGINE

with Simple Couscous

About the Recipe

I love Moroccan food and for me, there's nothing better than a really good tagine. This one is spectacular. Because I've taught this recipe a number of times in class, I've come to realize that many (most?) people think you need special equipment, i.e. a ceramic tagine dish, to create a proper tagine.This is absolutely not the case and a heavy casserole or Dutch oven will seamlessly do the trick.

November is the month when holiday guests and extra busy-ness kick into gear. This recipe is great for a crowd. And even better, once cooled completely and defatted, it freezes perfectly. Just defrost and re-heat when needed.

There are a lot of ingredients, but once you have them, the recipe itself is not hard. Sometimes I brown the chicken pieces in a separate skillet or use a separate skillet in addition to the casserole to get things going a bit faster.

An added perk is that it tasted better made up to 4 days in advance. Like soups and stews (it is in fact a stew) tagines improve when the flavors have a couple of days to come together. This one can be prepared up to 4 days ahead. Refrigerate when cool. Then bring to room temperature and reheat slowly to serve.

Couscous takes five minutes to make once the water comes to a boil though I usually make it about 15 minutes ahead and let stand till I'm ready. Covered, it will stay hot for at least 30 minutes. Fluff it as best you can with a couple of forks but sadly, unless you are some sort of miracle worker, you won't get rid of every single lump so don't worry about them.


MOROCCAN CHICKEN TAGINE with SIMPLE COUSCOUS

Serves 12

Ingredients:

For the Chicken Tagine:

  • 2 large onions, finely minced (can use 10 cloves minced garlic instead)

  • 4 tablespoons olive oil

  • 4 tablespoons ground cumin

  • 2 tablespoons ground ginger or 4 tablespoons grated fresh ginger

  • 3 teaspoons salt

  • 4 teaspoons ground turmeric

  • 4 teaspoons paprika

  • 2 teaspoons ground cinnamon

  • 2 teaspoons freshly ground black pepper

  • 5-6 pounds boneless, skinless chicken thighs

  • 5 tablespoons olive oil

  • 4 large yellow onions, thinly sliced

  • ½ teaspoon sugar

  • 2 1/2-5 cups homemade chicken stock or cups best store-bought chicken stock or use ROAST CHICKEN BETTER THAN BOUILLION (Better than Bouillion is preferable to most canned or packaged chicken stocks)

  • 1 teaspoon crumbled saffron threads

  • 30 Moroccan, Greek, Calamata or other pitted imported black olives, cut in half vertically if large

  • 4 preserved lemons, seeded and cut into thin slivers

  • 2 15-16 ounce cans chickpeas, rinsed and drained

  • 2 bunches chopped cilantro

  • 1 cup chopped pitted dates, divided

  • 1/3 cup toasted chopped or slivered almonds and more cilantro to sprinkle over the top

For the Couscous:

  • 3 cups couscous (regular or whole wheat)

  • 4 cups water

  • 3 tablespoons olive oil

  • 1-1/2 teaspoons salt or more to taste

  • 1 teaspoons freshly ground black pepper or more to taste

  • 1 teaspoon ground cinnamon or to taste


Method

For the Chicken Tagine:

  1. Combine all the spice mixture ingredients in a bowl large enough to comfortably hold chicken pieces.

  2. Add chicken and toss to coat well. This can be done up to 24 hours ahead and refrigerated

  3. Heat 2 tablespoons of the olive oil in a large casserole. Brown chicken in batches, placing the pieces back in the bowl as browned. Add more oil as needed.

  4. Add the sliced onions and the sugar to the pan, adding a little more oil if necessary and cook, stirring often for 10 minutes. Add the chicken back to the pan and continue to cook and stir until the onions turn gold, approximately 5-10 minutes more.

  5. Add the stock and the saffron. Bring to a boil and then immediately reduce the heat to simmer. Cover and simmer for 30 minutes. Skim off the fat.

  6. After 30 minutes, add the olives, lemon and ½ cup of the chopped dates. Cover and simmer 30 minutes more or cook uncovered if the sauce seems too thin. Skim off the fat. Add more stock if the sauce is too thick. Chicken should be very tender and almost falling apart. If it is not, recover and simmer until it is. Add the chickpeas and remaining dates and cook another few minutes until everything is heated through

    ***At this point, you can let the tagine cool uncovered and then cover and refrigerate for up to 4 days. When ready to serve, remove any fat that has congealed on the surface, bring to room temperature, leave uncovered and reheat on top of the stove, over medium low heat, stirring often or in a 300F oven, stirring occasionally. Continue with recipe:***

  7. When ready, serve over couscous (recipe below) or rice and sprinkle with the cilantro and chopped almonds. Or pass the condiments separately.

For the Couscous:

  1. Bring the water to a boil in a large saucepan along with the oil and the salt. Stir in the couscous. When the water comes back to the boil, cover and take the pot off the heat. Let sit at least 5 minutes.

  2. When ready to serve, fluff couscous with a fork and break up lumps. Adjust seasonings

October 2023 - Classic Caesar Salad

Gail Monaghan

CLASSIC CAESAR SALAD

About the Recipe

Almost everyone loves a good Caesar Salad. For anchovy-haters you can omit the anchovies and use 1 tablespoon of Worcestershire Sauce instead of 1 teaspoon. However, it won't be the same.

I find that sometimes dressing on a Caesar salad is too thick and gloppy and sometimes (but less frequently) too thin. For me, this one is ideal, perfectly balanced. I've been making it for years with great results. If you try it, let me know what you think.


CLASSIC CAESAR SALAD

Serves 6-8 as a first course

Ingredients:

For the Salad:

  • 2 very large heads or 4 smaller romaine lettuce, outer leaves removed if not crunchy. At least 4 hours before serving, slice each head into ½ inch slices and then wash and dry in a salad spinner. Refrigerate in a kitchen towel until ready to use.

  • 3/4 cups garlic flavored extra virgin olive oil (steep oil overnight with 3 cloves of crushed garlic)

  • 12 or more to taste oil-packed anchovy fillets, minced

  • 1/2 teaspoon sugar

  • 1 scant teaspoon freshly ground pepper

  • 1 teaspoon Worcestershire Sauce

  • Dash of cayenne pepper or Tabasco Sauce

  • 3 eggs at room temperature

  • 1 tablespoon freshly squeezed lemon juice

  • 1 cup grated Italian Parmesan

For the Croutons:

  • 8 slices stale bread (French or Italian) crusts removed if desired, cut into approximate 1/2 inch cubes

  • 1/4 cup garlic oil (see above)

  • salt and pepper to taste


Method

For the Salad:

  1. 1. Mix 1/2 cup garlic oil together with the anchovies, sugar, Worcestershire sauce, pepper and cayenne. Set aside. This can be done up to 24 hours in advance.

  2. When ready to serve, toss the chilled prepared romaine in a salad bowl with the oil mixture.

  3. Beat the eggs and pour on top of the romaine, pour the lemon juice over and toss well. Toss in the Parmesan and croutons and check for salt. Because of all the anchovies you probably won’t need any but you might. Serve immediately.

For the Croutons:

  1. Toss cubed bread with 1/4 cup garlic oil, salt and pepper and spread on a baking sheet.

  2. Bake in a 350F oven, turning occasionally, until golden, about 20 minutes.

  3. Cool on paper towels.

    *The croutons may be made several days in advance and kept airtight once cooled

September 2023 - Grilled Marinated Butterflied Leg of Lamb with Fresh Mint Mayonnaise

Gail Monaghan

GRILLED BUTTERFLIED LEG OF LAMB

with Fresh Mint Mayonnaise

About the Recipe

Take advantage of outdoor grilling while the weather still allows it. This lamb is ideal cooked outside though also delicious grilled indoors or broiled. I make it all year long and frequently. Butterflied leg of lamb provides deliciousness without the hassle of the bone with the added perk that once butterflied, the meat varies in thickness and thus offers the perfect doneness for every palate

Fresh Mint Mayonnaise is a lovely twist on the classic combination of mint and lamb. It's super easy in a blender or food processor and leftovers are great on almost any sandwich or served alongside grilled or roast chicken or fish. It also makea a great shrimp or crab dip.


GRILLED BUTTERFLIED LEG OF LAMB WITH HOMEMADE FRESH MINT MAYONNAISE

Serves 8-10

Ingredients:

For the leg of lamb:

  • 4 pounds boned and butterflied leg of lamb

  • 2/3 cup olive oil

  • 3 tablespoons freshly squeezed lemon juice

  • 1 teaspoon salt

  • 1 teaspoon freshly ground black pepper

  • 1/4 cup chopped parsley

  • 3 crumbled bay leaves

  • 1 tablespoon chopped fresh marjoram or oregano (optional)

  • 2 cups thinly sliced onions

  • 3 cloves garlic, thinly sliced

  • salt and pepper to taste

For the mint mayonnaise:

  • 1 large egg

  • 1 teaspoon salt or more to taste

  • 1/4 teaspoon freshly ground pepper, preferably white

  • 1-1/2 tablespoon freshly squeezed lemon juice or more to taste

  • 1 large clove garlic

  • 2 teaspoons Dijon mustard

  • 1 to 1-1/4 cups oil — half unflavored vegetable oil (such as corn, canola or peanut) and half olive oil

  • 1/2 to 1 cup fresh mint leaves


Method

For the leg of lamb:

  1. Mix the marinade ingredients together and marinate the meat (refrigerated and turning occasionally) for at least 12, preferably 24, hours.

  2. Take out of the refrigerator 4-6 hours before grilling. When ready to cook, salt the meat and place it fat side down on a hot broiler or grill. Cook for 10 minutes and then turn with tongs and moisten with more marinade. The onions may burn a bit but are still delicious. Cook 5 minutes more and then check for doneness. If not done to your liking, continue to cook until it is, turning and moistening occasionally with marinade. Let rest ten minutes before serving along with the onions.

For the mint mayonnaise:

  1. Process the room temperature egg, salt, pepper, lemon juice, garlic, and mustard in a food processor or blender until combined.

  2. With the motor running, add the mixed oils, a few drops at a time. After about 1/3 of the oil has been added, add the remaining oil in a very slow steady stream.

  3. Add the mint and pulse till just combined

  4. Adjust salt, pepper and lemon juice to taste. Refrigerate until ready to serve. Leftovers can be stored in the fridge for at least a week.

August 2023 - 5 No-Cook Sauces for Summer Grilling

Gail Monaghan

5 NO-COOK SAUCES

for Summer Grilling

About the Recipe

Grilling over an open fire helps define summer. Nonetheless, by August the novelty has waned a bit and I look for something extra to enhance my flame-kissed proteins and vegetables. Over the years, I've developed a repertoire of quick, highly flavorful, no-cook sauces—from vinaigrettes to fresh salsas to creamy dressings—that dramatically enliven any cookout.. I frequently put out a selection of these condiments and let guests pick and choose.

Here are five of my favorites, most of them completely makeable in the food processor and, conveniently, improved if prepared up to several days in advance. The old-fashioned Thousand Island dressing is a blush-colored amalgam of mayonnaise, chili sauce, ketchup and an assortment of flavor- and texture-enhancing add-ins (minced olives, dill, horseradish, bell pepper). My mother was given the recipe below in the 1950s, by the chef at Lake Tahoe's then-legendary Brockway Hotel, where the dressing typically adorned wedges of iceberg lettuce. These days, I prefer it with platters of grilled vegetables, chicken and fish or on a sandwich.

Delicious with fish, especially swordfish and salmon, is the cucumber-dill sauce. Nothing more than sour cream—or Greek yogurt, if you prefer—brightened with dill, chives, vinegar and crunchy cucumber, it's a staple in my fridge all summer long. Hailing from Syria and considerably more piquant is the muhammara, a red pepper dip enriched with ground walnuts and sweetened with pomegranate molasses. I generously slather this rustic condiment on all sorts of things, my favorite being garlicky grilled peasant bread.

Another enticingly sweet-spicy combination—this one including ginger, honey, garlic and toasted sesame oil—the peanut sauce pairs well with Asian preparations. The same is true of the mango-mint chutney, which is also a good match for many Mexican-style dishes. Its mingling of mango, citrus and cilantro is so refreshing that I even serve it on its own as a salad. Unlike the other sauces here, it is best used the day it is made.


OLD-FASHIONED THOUSAND ISLAND DRESSING

Makes 2 Cups

In a small bowl, combine 1 cup mayonnaise¼ cup chili sauce¼ cup ketchup1½ tablespoons minced pitted black olives2 tablespoons minced flat-leaf parsley2 teaspoons prepared white horseradish2 teaspoons sweet relish1 large shallot, finely minced2 tablespoons finely minced green bell pepper, 1 tablespoon finely minced fresh dill2 tablespoons freshly squeezed lemon juice1 teaspoon sea salt, a pinch of cayenne pepper and freshly ground black pepper to taste. Let rest at least 30 minutes before serving. Dressing can be stored, refrigerated, up to 4 days.

*Try it with: grilled vegetables, chicken, shrimp, scallops, hamburgers


CUCUMBER-DILL SAUCE

Makes 4 Cups

In a medium bowl, combine 2 cups sour cream or plain Greek yogurt1 medium red onion, finely minced¼ cup minced chives½ cup finely minced fresh dill4 tablespoons Champagne or white-wine vinegar, a few drops of Tabasco and sea salt and freshly ground white pepper to taste. Refrigerate at least 1 hour. When ready to serve, stir in 1 medium cucumber, peeled, seeded and cut into ¼-inch dice, and adjust seasoning as needed. Sauce can be stored, refrigerated, up to 3 days.

*Try it with: grilled salmon, swordfish and shrimp; baked potatoes


FRESH MANGO-MINT CHUTNEY

Makes 7-1/2 Cups

In a large bowl, combine 2 large mangoes, peeled and cut into ½-inch dice1 cup coarsely chopped cilantro¾ cup julienned fresh mint½ cup finely minced red onion½ jalapeño, ribs and seeds removed, finely mincedjuice and zest of 2 limes and salt and freshly ground black pepper to taste. Let rest at least 1 hour at room temperature. Adjust seasoning as needed and serve. Chutney can be stored, refrigerated, 3 days, but is best if consumed the same day it is made.

*Try it with: grilled tofu, pork and duck; seared tuna


MUHAMMARA

Makes 3 Cups

In a food processor, combine 1½ cups walnuts½ cup breadcrumbs or crumbled sesame crackers1 tablespoon freshly squeezed lemon juice2 tablespoons pomegranate molasses½ teaspoon ground cumin½ teaspoon sugar and salt to taste. Blend until smooth. Add a 28-ounce can roasted sweet red bell peppers, drained, and blend until creamy. With motor running, add 2 tablespoons extra-virgin olive oil in a steady stream. Add ½ teaspoon red chili paste and pulse to incorporate. Refrigerate overnight. To serve, let sauce come to room temperature and garnish with ground cumin and olive oil. Muhammara can be stored, refrigerated, up to 1 week.

*Try it with: grilled lamb kebabs, duck, pork, fish and even bread


PEANUT SAUCE

Makes 2-1/4 Cups

In a food processor or blender, combine 1 cup creamy peanut butter3 cloves garlic2 tablespoons peeled and coarsely chopped gingerzest and juice of 1 large limelarge pinch of cayenne pepper, 2 tablespoons honey3 tablespoons soy sauce1 tablespoon rice vinegar1 tablespoon toasted sesame oil2-4 tablespoons light coconut milk or water, as needed to reach desired texture, and salt to taste. Process on high speed until smooth. Add 1/3 cup chopped cilantro and pulse to combine. Sauce can be stored, refrigerated, up to 1 week.

*Try it with: grilled chicken, fish, seafood, pork; soba-noodle salad, raw vegetables

July 2023 - Sautéed Soft-Shell Crabs with Ginger-Lemongrass Vinaigrette

Gail Monaghan

SAUTÉED SOFT-SHELL CRABS

with Ginger-Lemongrass Vinaigrette

About the Recipe

I tasted my first soft-shell crab on the porch of a Chesapeake Bay seafood shack on a June afternoon in the early 1970's. This new treat was sweet, briny, complex and even more succulent than the hard-shell kind—plus, no need for crackers and bibs.

The soft-shell is actually the very same species that is harvested, cracked and eaten around the Chesapeake and the Gulf of Mexico at other times of year—the blue crab or Callinectes sapidus.  

For years I imagined soft-shell crabs to be restaurant-only fare, but when a friend effortlessly fried up a platterfull  in his own kitchen, I realized how easy they are to prepare at home. And the season is NOW.

Soft-shells should be alive when purchased, kept on ice in the fridge until ready to cook and used that same day. My fishmonger cleans the crabs for me, but you can use scissors to snip off the mouth, eyes, gills and the flat abdominal apron yourself before cooking, if you like.

I love the marine delicacy accompanied with ginger-lemongrass vinaigrette and cilantro. But the crabs can be served a million ways. They make a divine sandwich on a toasted bun along with crispy bacon, tomato, avocado watercress and homemade mayo or tartar sauce. 

A last tip: be sure not to undercook them.


SAUTÉED SOFT-SHELL CRAB with GINGER-LEMONGRASS VINAIGRETTE

Serves 4 as a first course, 2 as a main course

Ingredients:

For the ginger-lemongrass vinaigrette:

  • For the ginger-lemongrass vinaigrette:

  • 1/4 cup rice vinegar

  • 2-1/2 tablespoons lime juice

  • 5 teaspoons maple syrup

  • 1/3 cup smashed and coarsely chopped fresh lemongrass

  • 1 (2-inch) piece fresh ginger, peeled and coarsely chopped

  • 1 large shallot, coarsely chopped

  • 1 large clove garlic, coarsely chopped

  • 1-1/2 teaspoons chili paste

  • 1-1/2 teaspoons sesame oil

  • 1 tablespoons soy sauce or Vietnamese fish sauce

  • 1/2 cup canola oil

  • Salt and freshly ground black pepper

For the crabs:

  • 1/4 cup flour (preferably superfine flour, such as Wondra)

  • Salt and freshly ground black pepper

  • 4 soft-shell crabs, cleaned

  • 1 tablespoon neutral vegetable oil, such as canola

  • Chopped chives and/or cilantro, for garnish 


Method

  1. Make vinaigrette: Place all ingredients except canola oil, salt and pepper in a blender or food processor and blend until very smooth. In slow, steady stream, pour oil into blender. With motor off, add salt and pepper to taste. Let sit at least 15 minutes before using. (Dressing can be refrigerated up to 3 days.)

  2. Meanwhile, prepare crabs: In a bowl, mix flour with salt and pepper. Sift flour over crabs, coating both sides.

  3. Sauté crabs: Heat oil in a nonstick skillet large enough to hold all crabs, over high heat. (If necessary to avoid crowding pan, cook in batches.) When oil begins to smoke, add crabs, top-side down. Sauté crabs until brown and crisp, 3-4 minutes per side. If working in batches, set cooked crabs aside and repeat with remaining crabs.

  4. To serve, spoon about 3 tablespoons vinaigrette onto the centers of 4 dinner plates. Split each crab in half lengthwise and place over vinaigrette. Garnish with chopped cilantro and/or chives.

June 2023 - Classic Individual Chocolate Soufflés

Gail Monaghan

CLASSIC INDIVIUDAL

CHOCOLATE SOUFFLÉS

About the Recipe

Everyone loves soufflés, especially huge, decadent chocolate ones. However, I like individually portioned chocolate soufflés even better. And better than that when they're oversized. And best of all when sauced with melty ice cream. 

Made correctly, soufflés—light and fluffy baked concoctions founded on an egg yolk and beaten eggs white base—possess a delicate, ethereal texture particularly suited to spring. Just the thought of these airy culinary miracles confounds many cooks, but their preparation is actually easy to get the hang of. And chocolate soufflés (which don't require making an initial roux and are flourless — for all of you gluten-free-ers out there) are the easiest of all. To intensify the flavor of the chocolate for an ever richer flavor, add 2 teaspoons of instant espresso powder when melting the butter with the chocolate.


CLASSIC INDIVIDUAL CHOCOLATE SOUFFLÉS

Serves 8

Ingredients:

  • Approximately 3 tablespoons unsalted butter and 4 tablespoons granulated sugar to prepare the molds 

  • 8 ounces best quality bittersweet chocolate, coarsely chopped 

  • 2/3 cup plus 4 tablespoons granulated sugar 

  • 1/2 cup warm milk 

  • 6 egg yolks 

  • 8 egg whites at room temperature 

  • 1/8 teaspoon salt 

  • 1 teaspoon cream of tartar


Method

  1. Preheat oven to 400 degrees. Generously butter and then sugar eight 1-1/4 cup ramekins, soufflé molds or little charlottes. 

  2. Melt chocolate in a double boiler over low heat. When chocolate is melted, remove the pan from the heat. 

  3. Whisk in the 2/3 cup sugar and the milk until the mixture is smooth. Then whisk in yolks, one at a time, until no traces of yolk remain.

  4. To finish the soufflés: Whisk the room temperature egg whites with salt and cream of tartar, preferably in an electric mixer with a whisk attachment in place. Start beating on low speed and raise the speed gradually as the egg whites mount. When whites are opaque and beginning to stiffen, very gradually add remaining sugar and continue to beat until soft (not super stiff) peaks form. 

  5. Stir a quarter of beaten whites into the chocolate mixture and then use a large silicone spatula to gently fold the lightened chocolate into the remaining whites.

  6. Ladle batter into prepared molds, set them on a baking sheet and place them on the middle rack of the preheated oven. Immediately reduce oven temperature to 375 degrees and bake for 20-25 minutes or until a knife blade inserted into the middle of a soufflé comes out clean. If you like your soufflés creamy at the center, remove them from the oven a bit sooner. Serve immediately.

  7. Accompany with whipped cream or melty vanilla or coffee ice cream and/or chocolate sauce if desired.


May 2023 - My 'A Voce' Salad

Gail Monaghan

MY ‘A VOCE’ SALAD

About the Recipe

This salad was inspired by one I tasted years ago at Manhattan's now-closed A VOCE restaurant. I have a feeling my salad is probably a good deal different from what I ate there 10 or 15 years ago, but it is very, very good.

As it contains Granny Smith apples, it's perfect for May, just before summer fruit arrives and takes precedence. The apples, shaved Parmesan, Marcona almonds, raisins, and crunchy celery and fennel turn a basic arugula salad into food for the gods. The dish is a great starter but also works as a vegetarian lunch main course. Or add chicken if you want something a bit heartier. 


MY ‘A VOCE’ SALAD

Serves 8

Ingredients:

For the Salad:

  •  8 large handfuls baby arugula

  • 2 large Fennel bulbs, very thinly sliced

  • 2 granny smith apples, very thinly sliced

  • 1 cup Marcona almonds (toasted, salted). Toasted blanched almonds may be substituted but do use Marcona almonds if you can

  • 1 teaspoon fennel pollen. If you do not have fennel pollen, add about 1/8 tsp powdered fennel to the dressing

  • 1 cup Golden raisins (or regular raisins)

  • 1 cup shaved parmesan (or big grate)

  • 1 cup thinly sliced celery 

Dressing:

  •  2 tablespoons freshly squeezed lemon juice

  • 2 tablespoons Sherry vinegar

  • salt and pepper to taste

  • 2 thinly sliced large shallots

  • 1 large garlic clove, minced or put through garlic press

  • ¾ cup extra virgin olive oil


Method

  1. In a jar, shake together the lemon juice, vinegar, salt, pepper and shallots. Set aside for at least 30 minutes —then add remaining dressing ingredients and shake, Let rest at least an hour before using. Can be made up to 3 days ahead and refrigerated. 

  2. Place all salad ingredients in a large salad bowl. Add enough dressing to moisten and flavor. Toss. Adjust salt and pepper

April 2023 - Flourless Chocolate Cake with Coffee Whipped Cream

Gail Monaghan

FLOURLESS CHOCOLATE CAKE

with Coffee Whipped Cream

About the Recipe

This super simple French chocolate cake has been an all time favorite in my cooking classes forever. I can't tell you how many private groups have requested it for dessert.  I'm offering it here as my April recipe as it's unleavened and is the best Passover dessert bar none. And of course, it's as good or better than almost any other gluten-free dessert I can think of. Don't overcook it as it's nice super moist in the center. The cake will rise as it bakes but then fall and crack as it cools. That is what it is supposed to do so don't be alarmed. Serve it a la mode or with vanilla or coffee whipped cream. Leftovers are great for breakfast with an espresso or cappuccino. It's even better made a day or two ahead. Just be sure to wrap it airtight once completely cool. 

I've suggested serving the cake with coffee whipped cream and have shared the recipe, but vanilla or coffee ice cream or vanilla whipped cream are delicious as well.


FLOURLESS CHOCOLATE CAKE WITH COFFEE WHIPPED CREAM

For the Cake:

Ingredients:

  •  1/2 cup unsalted butter, cut into small pieces plus butter to grease the pan

  • 8 ounces bittersweet chocolate cut into small pieces

  • 1 tablespoon instant espresso (optional but delicious addition)

  • 5 large eggs, separated and at room temperature

  • 1/2 teaspoon cream of tartar

  • 1/8 teaspoon salt2/3 cup sugar

  • powdered sugar for garnish

Method:

  1. Preheat the oven to 325

  2.  Butter and flour a 10-inch round spring form cake pan with 3-inch sides

  3. Place the chocolate, butter and instant espresso over simmering water until melted, stirring occasionally

  4. Meanwhile, in a large bowl, whisk together the egg yolks, salt and all but 3 tablespoons of the sugar

  5. Stir the melted chocolate mixture into the yolk mixture

  6. With an electric mixer and using the whisk attachment, whisk the room temperature egg whites with the cream of tartar and the salt on medium speed until soft peaks begin to form. VERY gradually beat in the remaining 3 tablespoons of sugar, raise mixer speed and beat until the whites form soft peaks. 

  7. Stir 1/4 of the whites into the chocolate mixture and then fold the chocolate mixture into the remaining beaten whites

  8. Pour into the prepared pan and use a spatula to gently even and smooth the top

  9. Bake until a toothpick inserted into the cake’s center comes out clean, about an hour or an hour and a quarter. Don't overbake. After 5 minutes remove the sides of the pan and the bottom after 30 minutes. As the cake cools it will fall and crack. Don’t worry. 


Serve warm or at room temperature with coffee whipped cream, regular whipped cream or ice cream


For the Coffee Whipped Cream:

Ingredients:

  • 2 cups VERY COLD heavy whipping cream

  • ½ cup powdered sugar

  • 1 tablespoon-or more to taste-- instant coffee granules 

  • ½ teaspoon vanilla extract

  • Pinch of salt

Method:

  1.  Put all ingredients in in the bowl of an electric mixer and refrigerate or freeze for at least 15 minutes.

  2. Beat with an electric mixer for 4-5 minutes, or until stiff peaks form / it’s scoop-able with a spoon and holds its shape.

March 2023 - Roast Whiskey Salmon

Gail Monaghan

ROAST WHISKEY SALMON

About the Recipe

I've been making this salmon dish for decades, possibly since my early twenties. I honestly have no recollection where the recipe came from, but I know I've adapted it more than once over the years.

It's best made with Canadian Club but in a pinch Irish whiskey or even Bourbon will do. Scotch less so. It's equally good hot, warm or room temperature. Try it on the grill in summer. Divine.

I usually serve it with Balsamic Onions, Spoonbread and haricots verts vinaigrette or a green salad. For a bit more heat, consider adding a teaspoon or so of grated fresh ginger to the marinade.


ROAST WHISKEY SALMON

Serves 6-8

INGREDIENTS

For the Marinade:

  • 1/2 cup olive oil 

  • 2 teaspoons dark (toasted) sesame oil

  • 7 tablespooons soy sauce or tamari 

  • 3/4 cup Canadian Club Whiskey

  • 3 tablespoons dark brown sugar

  • 4 cloves garlic, peeled and finely minced

  • a few drops of Tabasco or similar hot chili sauce

Fish:

  • 3 pounds of salmon  filet cut horizontally into 6 or 8 equal pieces, skin left on


Method

  1. Whisk all the marinade ingredients together or shake them in a jar. Refrigerate the marinade at least 6 hours before using—and up to a week. Or the marinade can be frozen for up to 6 months

  2. The day you are planning to cook the salmon, place it in the marinade and refrigerate for at least 6 hours. You can marinate the salmon for up to 24 hours.

  3. Place a metal baking pan (with sides no higher than about 2 inches) in the oven. The pan should be large enough to hold the fish pieces with plenty of room around each one so the fish bakes and does not steam. Preheat the oven to the hottest setting (500F-525F).   

  4. When the oven is hot, quickly place the salmon pieces in the pan. They will sizzle. 

  5. Bake 8-15 minutes until desired doneness is achieved. Serve hot, warm or room temperature.

February 2023 - Rosemary Parmesan Cocktail Nibbles

Gail Monaghan

ROSEMARY PARMESAN COCKTAIL NIBBLES

About the Recipe

Start your Valentine's Day evening with drinks and these divine nibbles, the perfect entree to anyone's heart. However, they are also thoroughly perfect and appreciated any day of the year. And, if you really want to indulge yourself or someone else, they make a great late afternoon snack.

Savory shortbreads such as these are beyond addictive--ideal with wine, bubbly or that special cocktail. Make extra and store in the freezer (in raw logs or as finished biscuits) for at least six months. Just make sure to wrap them super airtight so they don't get freezer burn.


ROSEMARY PARMESAN COCKTAIL NIBBLES

INGREDIENTS

  • 2 cups all purpose flour

  • 4 ounces (approximately 1 cup) toasted walnuts, chopped small

  • 2 tablespoons finely minced fresh rosemary

  • 1 teaspoon fine sea salt

  • Pinch cayenne pepper

  • 1/8 teaspoon freshly ground black pepper

  • 2 sticks (1/2 pound) unsalted butter, room temperature

    1/2 pound freshly grated Parmigiano Reggiano cheese

Method

  1. Mix everything except the butter and the cheese together in a medium bowl and set aside.

  2. Using an electric mixer or by hand with a large spoon, cream the butter until light and fluffy, approximately 3 minutes. Add  the cheese and mix until well combined.

  3. Add the dry ingredients and mix on low speed until just combined.

  4. Divide the dough into 4 or 5 pieces and roll each piece into a log about 1 1/2 inches in diameter. This is much easier if you lightly flour your hands and the dough.

  5. Wrap each cylinder in plastic wrap and refrigerate at least 1 hour and up to 2 days. Or freeze for up to 6 months. 

  6. Preheat oven to 350 F. Cut the logs into 3/8-inch slices and place on parchment-lined cookie sheets. If frozen, thaw until sliceable.

  7. Bake 12 to 15 minutes or until golden. Transfer to wire cooling racks. When completely cool, store in airtight containers for up to a week or freeze for up to 6 months.


January 2023 - Shrimp "Rockefeller"

Gail Monaghan

SHRIMP “ROCKEFELLER”

About the Recipe

I have mixed feelings about Oysters Rockefeller. I adore the spinach mix and I adore oysters but in all versions of the dish that I've tasted, the sublime, briny taste of the delicate oysters was lost in all the (admittedly delicious) greenery.

A recent tasting of Galatoire's version of the original dish prompted me to replace the oysters with shrimp. I was thrilled with the result. The larger, sturdier and less subtle shrimp did the trick. This shrimp adaptation of the Galatoire's oyster recipe is now a favorite, as well as a go-to dish. I serve it both as a first course and as a main depending on the menu and occasion. There is an certain chic to serving individual starter portions before an elegant dinner while the dish becomes homey and comforting served as a main course from a large gratin dish.


SHRIMP “ROCKEFELLAR”

Serves 6

INGREDIENTS

  • 3/4 cup chopped fresh fennel 

  • 1/4 cup chopped leeks, well washed (green and white parts)

  • 1/4 cup finely chopped fresh parsley

  • 2 green onions, finely chopped

  • 1 large rib celery, finely chopped

  • 1/4 cup ketchup

  • 1 1/2 cups chopped frozen spinach, microwaved 4  minutes and drained

  • 3/4 teaspoon salt or more to taste   

  • 1/2 teaspoon Tabasco Sauce or 1/4 teaspoon cayenne pepper

  • 1/2 teaspoon white or black pepper

  • 1 teaspoon dried thyme 

  • 1 teaspoon ground anise or ground fennel

  • 2 teaspoons Worcestershire sauce

  • 1/4 cup Pernod

  • 6 tablespoons melted butter

  • 1/2 cup dried breadcrumbs (or Panko)

  • 3 pounds shelled and cleaned medium to large shrimp—tossed with garlic oil, salt, pepper, thyme and ground fennel

  • 12 lemon wedges for serving (optional)


Method

  1. Preheat oven to 500°F degrees. Rack in highest position

  2. In a food processor, combine fennel, leeks, parsley, scallions, celery, ketchup, spinach, salt, pepper, cayenne, thyme, anise, Worcestershire, and Herbsaint. Purée mixture thoroughly. Add melted butter. Then BRIEFLY pulse in the breadcrumbs. DON'T OVERMIX

  3. Spread the shrimp in one tight layer in an oval ceramic baking dish just large enough to hold the shrimp in one layer. and bake for 2 minutes. If preferred, you can divide the shrimp among 6-8 individual gratin dishes instead and proceed with the recipe.

  4. Remove from oven and spread the spinach mixture evenly over all the shrimp

  5. Return to oven and bake for 2 minutes more

  6. Raise to BROIL and broil 3 minutes or until hot and bubbly and beginning to crust. Serve.

Notes:

You can make this several hours ahead and reheat in a 500 degree oven for a few minutes. If you do that, much prettier if you mix about 1/4-1/3 cup more breadcrumbs with a couple of tablespoons melted butter and sprinkle over the top before reheating. You can also sprinkle the breadcrumbs on after step 6 and return to a 500 degree oven for a minute or until just golden. You don't want to overcook the shrimp.

December 2022 - Buckwheat Blini

Gail Monaghan

BUCKWHEAT BLINI

served with caviar, smoked salmon, gravlax, or whatever else comes to mind

About the Recipe

December is HOLIDAY MONTH and I find there is nothing more festive than Buckwheat Blini. They are very easy to prepare — no harder than making pancakes for your kids — but for some reason the idea of making them intimidates many. They used to intimidate me as well, primarily because I believed I had to fry them up last minute while guests were arriving and there was so much else to do.

It turns out that BLINI are quite fine (ABSOLUTELY) made ahead and frozen or refrigerated until needed. My rule of thumb is refrigerate the finished blini for up to 48 hours, and for longer freeze.

Heat as needed — straight from the fridge or freezer on a parchment-lined 300F baking sheet. Cook until piping hot, about 10 minutes for frozen, about 5 minutes for refrigerated. At that point, try to serve right away.


BUCKWHEAT BLINI

Makes approx. 20-30 small blini, serving 4-6 as a first course or more as part of an hors d’oeuvres group.

*Recipe can be scaled up or down

INGREDIENTS

For the blini:

*Have all ingredients at room temperature

  • 2/3 cup buckwheat flour

  • 1 1/3 cup all-purpose flour

  • 1 teaspoon baking powder

  • 1 1/2 teaspoon salt

  • 1 3/4  cup whole milk — you will probably need more to get the correct consistency but start with the 1 3/4 cup

  • 2 extra-large eggs

  • 2 tablespoons unsalted butter, melted

  • 14 tablespoons, unsalted butter or as needed for the pan. If you use a nonstick pan as I do, way less butter will be needed. Probably none after the first few blini.

Accompaniments:

  • 1 pound, or more if desired, smoked salmon, gravlax, sturgeon, sable, or whitefish thinly sliced, smoked clams, smoked oysters and/ or caviar of choice. You can also experiment with hot soft-cooked scrambled eggs or even better - and if you have the energy - a variety of toppings to choose from

  • Approximately 2/3 cup creme fraiche or sour cream

  • Fresh dill sprigs and lemon wedges, to garnish


Method

  1. Sift both flours, baking powder, and salt together into a bowl

  2. In a separate bowl, whisk together the milk, eggs, and the 2 tablespoons melted butter, then whisk the liquids into the flour mixture. Let this mixture rest at room temperature for at least an hour (and up to 3 hours) before using. If you are not going to make the blini within 3 hours, refrigerate or freeze the batter and bring back to room temperature before continuing.

  3. Heat 2 tablespoons of butter in a large heavy skillet—nonstick if possible

  4. Drop the batter into the hot skillet, 1-3 tablespoons (depending on size desired and use) at a time

  5. Cook over medium-low heat until bubbles form on the top side of the blini, about 2 minutes.

  6. Flip and cook for 1 more minute, or until brown and cooked through.

  7. Repeat with the remaining batter. Wipe the hot pan with a paper towel between batches and add more butter as needed. If using a nonstick pan, you probably won't need more butter.

  8. Place 4 or 5 plates in a 150 degree oven. As pancakes are ready, transfer them to a baking sheet lined with a tea towel or parchment paper and keep them warm in the oven while preparing the rest.

  9. To serve, spread each warm blini with dollop of creme fraiche, top with a piece of smoked fish or some caviar. Garnish with a sprig of dill and a lemon wedge. Alternatively, pass everything separately and let guests help themselves.

Notes:

Batter can be made up to 3-4 days ahead of time and refrigerated. It can also be frozen for 3 months or more. Bring to room temperature before cooking, and you may have to thin with a bit more milk. Blini batter should be about the consistency of heavy cream.

The cooked blini can also be frozen for up to 3 months. Cook them in batches and cool completely before laying them on a cooking sheet  in a single layer and placing in the freezer. Once frozen hard, pack in Tupperware (or similar) and freeze. To use, preheat oven to 300 and cook, in a single layer on a baking sheet, for about 10 minutes until very hot.  If you wish, you can heat the frozen blini in batches in batches so there will always be hot blini.

November 2022 - Caramelized Turnips

Gail Monaghan

CARAMELIZED TURNIPS

with coriander, cloves, cumin & anise

About the Recipe

I serve this rich, sweet-yet-savory winter side dish when I want something unusual yet spectacular to complement Thanksgiving Turkey though I also serve it alongside roast duck or magret, pork roast or chops, lamb shanks, or even Christmas goose. Try it — it’s quite amazing.


CARAMELIZED TURNIPS

Serves 4-6 as a side dish, or even 8-10 if there's a buffet with multiple sides on Thanksgiving

INGREDIENTS

  • 2 pounds medium-sized white turnips, peeled and cut into 1/4-inch vertical wedges

  • 2 quite firm but ripe Bosc unpeeled, halved, cored, cut into 10 wedges each

  • 1/4 cup vegetable oil

  • 2 star anise

  • 1/4 cup whole coriander seeds

  • 4 whole cloves

  • 2 tablespoons whole cumin seed

  • 2 teaspoons whole anise seed

  • 1 large yellow onion, peeled and chopped

  • 3 cloves of garlic, peeled and minced

  • 1/2 cup mild honey such as orange blossom or wild flower

  • 6 tablespoons cider vinegar

  • 2/3 cup dry white wine

  • 2/3 cup duck, pork, turkey, chicken stock or vegetable stock

  • sea salt and freshly ground black pepper to taste

  • 1/4 cup chopped cilantro, parsley or a mixture


Method

  1. Preheat the oven to 475 degrees F. Line a large sheet pan with parchment paper or aluminum foil. In a mixing bowl, toss the turnips and pears with the vegetable oil and the salt. Spread the turnips and pears in one layer on the sheet pan and roast, flipping with a spatula once or twice during cooking if you like, until the turnips are tender when pierced with a paring knife, 25 to 30 minutes (the turnips will be brown on some sides, the pears will be a bit darker).

  2. While the pears and turnips are roasting toast the star anise, coriander, cloves, cumin, and anise in a small skillet over a medium heat until fragrant. Cool and coarsely grind in a food processor. Set the spices aside.

  3. In a large skillet, heat the butter over a medium heat. Add the onions and sauté until soft. Then add the garlic and cook for 1 minute.

  4. Add the honey and vinegar to the pan and boil, stirring constantly, for 3-5 minutes or until the sauce is syrupy and a bit caramelized. 

  5. Add the ground spices and then the wine and boil for 2 minutes. Add the stock and reduce until once again syrupy and quite thick. Add salt and pepper to taste. At this point proceed with step 6 or set aside for up to 4 hours.

  6. To serve, reheat the sauce if necessary, add the turnips and pears to the hot sauce. When they have heated through, sprinkle with cilantro or parsley and serve to accompany roast pork, lamb, duck or turkey along with white or brown rice, a rice pilaf, or couscous.

October 2022 - Seared Tuna with Olives, Capers, Anchovies and Fresh Herbs

Gail Monaghan

SEARED TUNA

WITH OLIVES, CAPERS, ANCHOVIES & FRESH HERBS

About the Recipe

Normally, I cook seared tuna Asian-style, enhanced with soy sauce, lime juice, garlic and ginger. However, the Mediterranean flavors in this recipe provide a welcome change of pace.I sear the tuna just before guests arrive and then slice and sauce it when ready to serve. 

Serve with polenta and broccolini or a green bean salad.

If you aren't a seared tuna fan, the sauce is also good on grilled swordfish, roast halibut and even chicken thighs or breasts.


SEARED TUNA WITH OLIVES, CAPERS, ANCHOVIES & FRESH HERBS

Serves 6-7

INGREDIENTS

For the Sauce:

  •  1 cup coarsely chopped fresh basil leaves

  • 1/3 cup chopped fresh marjoram and/or fresh oregano

  • 1/2 cup tapenade or roughly chopped pitted olives (nicoise, Greek, castelvetrano) - the olives are optional but quite good

  • 2 cloves (or to tasted)  pressed or finely minced garlic 

  • 2 tablespoons olive oil or 1 tablespoon olive oil and 1 tablespoon oil from the canned anchovies

  • 2 tablespoons--or more-- rinsed and dried small capers

  • 1 2-ounce can anchovies packed in oil—patted dry and chopped

  • 1 large shallot, minced

  • Freshly grated lemon zest from 1 lemon

  • Freshly ground black pepper to taste

  • Sea salt if needed

For the Fish:

  • 3 pounds sushi grade tuna steak, 1 1/2 to 2 inches thick

  • Garlic oil or olive oil 

  • Sea salt and freshly ground pepper


Method

  1. Mix all the sauce ingredients together and set aside while you prepare the fish

  2. Rub the tuna steaks with olive oil (or garlic oil), then season generously with salt and pepper

  3. Place a heavy skillet large enough to hold the tuna steaks without touching over high heat for 5 minutes until very hot. Add the tuna and sear for 2-3 minutes per side until the outside is browned but the inside still very rare. Do not overcook.

  4. Let rest at least 5 minutes — and up to an hour — and then slice  against the grain and arrange on a platter topped with lots of sauce. If there is extra sauce pass it separately. 

September 2022 - Caramelized Corn with Curry & Fresh Herbs

Gail Monaghan

CARAMELIZED CORN

WITH CURRY AND FRESH HERBS

About the Recipe

In September I gorge myself on corn in all its permutations. Corn puddings, corn souffles, corn salads and maybe corn on the cob best of all. 

My August Recipe of the Month was Succotash, but I can't let the 2022 corn season end without passing on my recipe CARAMELIZED CORN WITH CURRY AND FRESH HERBS. Sweet and savory at the same time, the dish is far, far better than the sum of the parts (even if two of the parts are super fresh corn and butter).

Beyond easy, this recipe incorporates my latest kitchen hack. No idea why I didn't figure this one out years ago: Corn in its husk can be cooked in the microwave. QUICK, no messy husking and no waiting for the water to boil while your summer kitchen gets hotter and hotter. 


CARAMELIZED CORN WITH CURRY AND FRESH HERBS

Serves 5-6

Ingredients:

  •  6 ears super fresh corn

  • 4 tablespoons butter

  • 1 teaspoon (or more to taste) West Indian curry powder

  • Salt and freshly ground pepper to taste

  • 1 cup (or more) roughly chopped fresh mint or basil or a combination of the two


Method

  1. Microwave the corn in its husks on high for 8 minutes

  2. When the corn is cool (or cool enough to handle), Remove husks and silk. This will be MUCH easier than if the corn were raw. Cut the corn off the cob and if not using right about, store, covered in the fridge

    NOTE: This can be done up to a day ahead and refrigerated. Another NOTE: The sugar in raw corn turns to starch quickly. If you can cook the corn as soon as you get it, even if you're not using it for a day or two

  3. Melt the butter over high heat in a large skillet. Add the corn kernels and the curry powder and saute, stirring frequently, until quite brown in places. Some of the kernels will even pop. This will take 5-10 minutes depending on the size of the pan and the heat.

  4. When corn is deeply caramelized, add salt and pepper to taste and half the herbs and stir another minute or 2.

  5. Off heat, add the remaining herbs and serve hot or warm.

NOTE: Recipe can be made several hours ahead though Step 4. When ready to serve, reheat, stirring over high heat, complete Step 5 and serve.